> For the complete documentation index, see [llms.txt](https://help.trikset.com/llms.txt). Markdown versions of documentation pages are available by appending `.md` to page URLs; this page is available as [Markdown](https://help.trikset.com/en/studio/2d-model/restrictions.md).
# Adding restrictions to the 2D Model
* [Constraint description structure](/en/studio/2d-model/restrictions.md#struktura-napisaniya-ogranichenii)
* [Conditions](/en/studio/2d-model/restrictions.md#usloviya)
* [Atomic conditions](/en/studio/2d-model/restrictions.md#atomarnye-usloviya)
* [Variable types and arithmetic operations](/en/studio/2d-model/restrictions.md#tipy-peremennykh-i-arifmeticheskie-operacii)
* [Triggers](/en/studio/2d-model/restrictions.md#triggery)
* [Sensor names](/en/studio/2d-model/restrictions.md#nazvaniya-datchikov)
* [Additional robot properties](/en/studio/2d-model/restrictions.md#dopolnitelnye-svoistva-robota)
* [Working with the controller screen](/en/studio/2d-model/restrictions.md#rabota-s-ekranom-kontrollera)
* [Restrictions example](/en/studio/2d-model/restrictions.md#primer-dobavleniya-ogranichenii)
It is possible to add restrictions by [editing an XML file](/en/studio/2d-model/settings.md) to prepare [exercises ](/en/studio/exercises.md)for students.
There are three types of restrictions:
1. **Time restrictions.**\
For example, a time limit to complete a task or a specific action in a specific time frame.
2. **Spatial.**\
For example, adding regions ("Start", "Finish") or prohibiting/forcing a robot, its sensor, or some moving object to be at a certain time in a certain place.
3. **Device restrictions.**\
For example, a limitation on the set of sensors or on the behavior of devices.
## Constraint description structure
The main tag[`...`](/en/studio/2d-model/restrictions.md#constraints)which contains all the restrictions is used to describe them. Used as a container. Restrictions are described inside the tag, each inner tag must be one of four:
| Tag | Description |
| --------------------------------------------------------------------------------------------------------------------- | --------------------------------------------------------------------------------------------------- |
| [timelimit](/en/studio/2d-model/restrictions.md#timelimit) | Time limit. |
| [constraint](/en/studio/2d-model/restrictions.md#less-than-constraint-greater-than-less-than-constraint-greater-than) | A constraint with an arbitrary condition in violation of which a specified error will be generated. |
| [event](/en/studio/2d-model/restrictions.md#event) | The main tool for setting dynamic constraints. Used as a container. |
| [init](/en/studio/2d-model/restrictions.md#init) | An unconditional event that runs before the program starts executing. |
###
### \...\
The main tag containing all restrictions. Used as a container.
```markup
```
###
### \
Time limit. Mandatory.
#### Attributes
| Attribute | Description |
| ----------------- | --------------------------------------------------------------------------------------------------------------------------- |
| **value="value"** | Timeout in milliseconds after which the execution will be terminated and the "Time limit exceeded" error will be displayed. |
#### Syntax:
```markup
```
## \...\
A constraint with an arbitrary condition. If the condition is violated a specified error message will be displayed. Can be used as a container. Has one child tag: `...`.
#### Attributes
| Attribute | Description |
| ------------------------ | --------------------------------------------------------------------------------------------------------------------------------------------------------------- |
| **checkOnce="true"** | Boolean attribute. If the value is true, then the restriction will be checked once at program startup. Is useful for one-time checks such as sensor layout etc. |
| **failMessage="Error!"** | An error message will be displayed when a restriction is violated. |
#### Syntax:
```markup
```
```markup
```
```markup
```
## \...\
The main tool for setting dynamic constraints. Used as a container.
An event is just a pair ([condition](/en/studio/2d-model/restrictions.md#usloviya), [trigger](/en/studio/2d-model/restrictions.md#triggery)).
#### Attributes
| Attribute | Description |
| ---------------------------- | -------------------------------------------------------------------------------------------------------------------------------------------------------------------------------------------------------------------------------------------------------------------------------------------------- |
| **settedUpInitially="true"** | An attribute that allows you to indicate whether the event is set up at the start of the program. The event can be set up or dropped. In the setup state, the event pulls its trigger if its condition is met, otherwise it's just ignored by the system.
The default value is false.
|
| **id="finish checker"** | Events unique ID. The event can be referred by id from others. Optional. |
| **dropsOnFire = "true"** | A boolean attribute that indicates whether the event should continue to be set up after it is triggered or not. Optional. The default value is true. |
#### Syntax:
```markup
```
## \...\
Unconditional event executing before the program starts.
**Example:**
```markup
```
## Conditions
Now lets talk about the conditions in the [\](/en/studio/2d-model/restrictions.md#less-than-constraint-greater-than-less-than-constraint-greater-than) and [\](/en/studio/2d-model/restrictions.md#less-than-event-greater-than-less-than-event-greater-than) elements. Conditions are set using the [\](/en/studio/2d-model/restrictions.md#condition) tag if only one of the [atomic conditions](/en/studio/2d-model/restrictions.md#atomarnye-usloviya) is tested, or the [\](/en/studio/2d-model/restrictions.md#conditions-1) tag if a compound condition is tested.
### \...\
The condition being checked is described inside this tag.
**Example:**
```markup
```
###
### \...\
Used to create compound conditions. The logical bond is the mandatory attribute. The bond may be `and` or `or`. Negation is specified by the `` tag without attributes. Other `` elements may also appear among subexpressions.
#### Attributes:
| Attribute | Description |
| -------------- | ------------- |
| **glue="and"** | Logical bond. |
#### Syntax:
```markup
```
## Atomic conditions
Atomic condition is one of the following elements:
| Tag | Description |
| ------------------------------------------------------------------------------------------------------------------------------------------------------------------------------------------------------------------------ | --------------------------------------------------------------------------- |
| [equals](/en/studio/2d-model/restrictions.md#equals), [notEqual](/en/studio/2d-model/restrictions.md#notequal), [greater](/en/studio/2d-model/restrictions.md#greater), [less](/en/studio/2d-model/restrictions.md#less) | Value comparison operations. |
| [inside](/en/studio/2d-model/restrictions.md#inside) | Sets spatial constraints. |
| [settedUp and dropped](/en/studio/2d-model/restrictions.md#settedup) | Checks whether an event is set up or not. |
| [timer](/en/studio/2d-model/restrictions.md#timer) | Sets the time in ms after which the specified condition is considered true. |
###
### \...\
Equals. The functional symbols value comparison operation. Can be used as a container.
#### Syntax:
```markup
```
###
### \...\
Not equal. The functional symbols value comparison operation. Can be used as a container.
#### Syntax:
```markup
```
###
### \...\
Greater. The functional symbols value comparison operation. Can be used as a container.
#### Syntax:
```markup
```
###
### \...\
Less. The functional symbols value comparison operation. Can be used as a container.
#### Syntax:
```markup
```
###
### \
Sets spatial constraints.
#### Attributes
| Attribute | Description |
| ----------------- | ----------- |
| **objectId="id"** | Object ID. |
| **regionId="id"** | Region ID. |
#### Syntax:
```markup
```
###
### \ and \
Checks whether the event set up or not.
#### Attributes
| Attribute | Description |
| --------------- | ------------------------------ |
| **id="event1"** | The ID of the event is checked |
#### Syntax:
```markup
```
#### Example:
The "check event" event conditions check that the other "Try move" event is set up and the "Go back" event is dropped. If both of them return "true" after the check the program successfully ends.
```markup
```
###
### \
A predicate that starts to return "true" when the specified time has passed since the moment when this event was set, and up to that moment it returns "false".
#### Attributes
| Attribute | Description |
| ----------------------------- | ------------------------------------------------------------------------------------------------------------------------------------------------------------------------------------------------------------------------------------------------- |
| **timeout="1000"** | The time interval after which this predicate will become true. Mandatory. The value must be a non-negative integer. |
| **forceDropOnTimeout="true"** | A Boolean attribute that allows you to drop the event that has this timer in a condition.
If set to true, the event will be dropped even if there are other active timers and unmet conditions. Optional. The default value is true.
|
#### Syntax:
```markup
```
#### Example
Let's look at using \ with different forceDropOnTimeout attribute values.
The "check region" event checks time and spatial limits. The first condition (timer) becomes true after 1000ms. Its value doesn't change after that. The second one (inside) checks that the robot is inside the "start\_zone" region. When both conditions will be met simultaneously the program will end successfully.
1\. Since the forceDropOnTimeout attribute is "false", the event will be still set up after a specified timeframe and wait for the second condition to be met.
```markup
```
2\. Since the forceDropOnTimeout attribute is "true", the event will be dropped after the specified timeframe despite the presence of a second condition. Therefore, if the robot is not in the required region right after 1000 ms, then the success message will not be displayed even if the robot will be there after some time.
```markup
```
## Variable types and arithmetic operations
| Variable or operation | Description |
| -------------------------------------------------------------------------- | -------------------------------------------------------------------------------------------------- |
| [int, double, string, bool](/en/studio/2d-model/restrictions.md#intdouble) | Integer, fractional, string, and boolean constants. |
| [variableValue](/en/studio/2d-model/restrictions.md#variablevalue) | Variable value. |
| [objectState](/en/studio/2d-model/restrictions.md#objectstate) | Get the object state. |
| [typeOf](/en/studio/2d-model/restrictions.md#typeof) | Get the meta-type of the object with the specified identifier. |
| [minus, abs](/en/studio/2d-model/restrictions.md#minusabs) | Unary arithmetic functions that have exactly one child, which must be an integer value. |
| [sum, difference, min, max](/en/studio/2d-model/restrictions.md#summinmax) | Binary arithmetic functions that have exactly two child elements, each of them must be an integer. |
###
### \, \, \, \
Setting a constant.
#### Attributes
| Attribute | Description |
| ------------- | --------------- |
| **value="0″** | Constant value. |
#### Syntax:
```markup
```
###
### \
Variable value.
It is possible to take the property of any variable using a dot. For example, "rect.width" will return the width of the rectangle stored in "rect".
#### Attributes
| Attribute | Description |
| -------------------- | ------------- |
| **name="my\_value"** | Variable name |
#### Syntax:
```markup
```
###
### \
Get the object state.
#### Attributes
| Attribute | Description |
| --------------------------------------- | ----------- |
| **object="robot1.display.labels.size"** | Object ID |
#### Syntax:
```markup
```
#### Example
```markup
```
###
### \
Get the objects with specified ID meta-type. For example, the type of the `wall` object with `id=777` will be `wall`.
Most often, this element will be needed to check the type of connected sensors and motors.
#### Attributes
| Attribute | Description |
| ----------------- | ------------------ |
| **objectId="id"** | Objects unique ID. |
#### Syntax:
```markup
```
###
### \..\, \...\
Unary arithmetic operations for changing the sign and taking the modulus of a number.
#### Syntax:
```markup
```
#### Example:
```markup
```
###
### \, \, \, \
Sum and difference of values. Minimum and maximum value.
#### Example:
```markup
```
## Triggers
| Tag | Description |
| -------------------------------------------------------- | ---------------------------------------------------------------------------------------------------------- |
| [trigger](/en/studio/2d-model/restrictions.md#trigger) | An action or a group of actions that will be performed one or many times after the event condition is met. |
| [fail](/en/studio/2d-model/restrictions.md#fail) | Display an error message. Finish checking the task. |
| [success](/en/studio/2d-model/restrictions.md#success) | Display success message, finish the check. |
| [setter](/en/studio/2d-model/restrictions.md#setter) | Set the variable value. |
| [setUp, drop](/en/studio/2d-model/restrictions.md#setup) | Setting or dropping the event. |
###
### \...\
An action or a group of actions that will be performed one or many times after the event condition is met.
#### Syntax:
```markup
```
###
### \
Display an error message. Finish checking the task.
#### Attributes
| Attribute | Description |
| --------------------------- | ------------------ |
| **message="Wrong answer!"** | Error message text |
#### Syntax:
```markup
```
###
### \
The task is successfully done.
#### Attributes
| Attribute | Description |
| ---------------- | ---------------------------------------------------------------------------------------------------------------------------------------------------------------------------------------------------------------------------------------------------------------------------------------------------------------------------------------------------------------------------------------------------------------------------------------------------------------- |
| deffered="false" | Optional. The default value is "false". If set to "true" the trigger won't stop the program, I. e. the checker will wait until the program finishes and either reports the success if there were no errors, or otherwise, it will finish with an error. In other words, you won't get the error "The program has finished, but the task is not completed": the program will either terminate successfully or with a meaningful error like "Time limit exceeded". |
#### Syntax:
```markup
```
###
### \...\
Set the variable value.
#### Attributes
| Attribute | Description |
| ---------------- | ------------- |
| name="my\_value" | Variable name |
#### Example:
```markup
```
###
### \, \
Setting up or dropping an event.
#### Attributes
| Attribute | Description |
| ----------------------- | -------------------- |
| **id="finish checker"** | The ID of the event. |
#### Example:
```markup
```
## Sensor names
#### TRIK Robot Sensors
| Name | Description |
| ---------------------------------------------- | --------------- |
| twoDModel::robotModel::parts::RangeSensor | Distance sensor |
| trik::robotModel::twoD::parts::TwoDLightSensor | Light sensor |
| twoDModel::robotModel::parts::TouchSensor | Touch sensor |
| trik::robotModel::twoD::parts::LineSensor | Line sensor |
#### Lego EV3 Robot sensors
| Name | Description |
| ------------------------------------------------ | ----------------------------- |
| twoDModel::robotModel::parts::RangeSensor | Distance sensor |
| twoDModel::robotModel::parts::LightSensor | Light sensor |
| twoDModel::robotModel::parts::TouchSensor | Touch sensor |
| twoDModel::robotModel::parts::ColorSensorRed | Color sensor (red) |
| twoDModel::robotModel::parts::ColorSensorGreen | Color sensor (green) |
| twoDModel::robotModel::parts::ColorSensorBlue | Color sensor (blue) |
| twoDModel::robotModel::parts::ColorSensorPassive | Color sensor (passive) |
| twoDModel::robotModel::parts::ColorSensorFull | Color sensor EVX/NXT (color) |
| twoDModel::robotModel::parts::ColorSensorAmbient | Color sensor EV3 (ambient) |
| ev3::robotModel::twoD::parts::GyroscopeSensor | Gyroscope |
| ev3::robotModel::twoD::parts::GyroscopeSensor | Compass |
## Additional robot properties
| Property | Description |
| ----------------------- | ---------------------------------------------------------------------------------------------- |
| robot1.rotation | A current robot's rotation angle |
| robot1.x and robot1.y | Robots coordinate |
| robot1.led.color | LED color |
| robot1.marker.isDown | Checks if the robot has a marker and it draws a line on the field. Returns "true" or "false". |
| robot1.shell.lastPhrase | Get the last robots phrase. |
## Working with the controller display
| Property | Description |
| -------------------------------- | -------------------------------------------------------------------------------------- |
| robot1.display.sadSmiles | Checks if there is a sad smile on the controller display. Returns "true" or "false". |
| robot1.display.smiles | Checks if there is a happy smile on the controller display. Returns "true" or "false". |
| robot1.display.labels.first.text | Message (label) text that was displayed first. |
| robot1.display.labels.last.text | Message (label) text that was displayed last. |
| robot1.display.labels.size | Get the displayed label number. |
#### Example
Checking that the word “message” was displayed on the controller screen. The case is important.
```markup
```
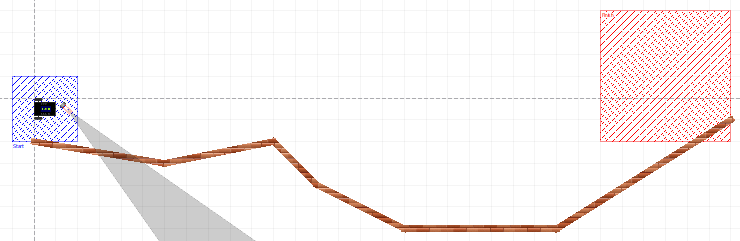
## Restrictions example
You need to start in the blue square then drive along the wall to the red one using the IR distance sensor.
```markup
```