LogoLogo
TRIK StudioTRIKLego EV3Lego NXT
English
English
  • TRIK help
  • TRIK Studio
    • About TRIK Studio
      • How to find out the version of TRIK Studio
    • Getting started and creating a project
    • TRIK Studio interface
      • TRIK Studio main menu
      • Working with graphs
      • How to open robot settings
      • How to change TRIK Studio interface language
    • TRIK Studio settings
    • 2D model
      • 2D model tuning
      • Adding restrictions to the 2D Model
        • Restrictions setting examples
    • Visual programming
      • Adding and removing blocks
      • Common blocks
      • Links between blocks
      • Syntax of expressions in the blocks
        • TRIK Studio language types
          • Array
        • TRIK Studio language tokens
        • TRIK Studio language operators
        • Constants
        • Sensor variables
        • Built-in functions
      • Property editing
      • Subprograms
    • Textual programming
    • Exercises
    • External tools
      • PuTTY
      • WinSCP
    • TRIK Studio shortcuts
    • Antivirus conflicts
      • Avast antivirus blocks TRIK Studio. What to do?
  • TRIK Studio Junior
    • About TRIK Studio Junior
      • How to find out the version of TRIK Studio Junior
    • Getting started and creating a project in TRIK Studio Junior
    • TRIK Studio Junior interface
      • How do I replace the "Character movement" image?
    • TRIK Studio Junior settings
    • Visual programming in TRIK Studio Junior
      • Adding and removing blocks in TRIK Studio Junior
      • Blocks in TRIK Studio Junior
      • Links between blocks in TRIK Studio Junior
      • Syntax of expressions in the blocks in TRIK Studio Junior
      • Property editing in TRIK Studio Junior
      • Subprograms in TRIK Studio Junior
    • Exercises in TRIK Studio Junior
  • INTEGRATIONS
    • PyCharm
      • Running a 2D model in TRIK Studio from PyCharm
    • Sublime Text
      • Running a 2D model in TRIK Studio from Sublime Text
      • Uploading programs to several TRIK robots from Sublime Text
    • VSCode
      • Running a 2D model in TRIK Studio from VSCode
      • Uploading programs to several TRIK robots from VSCode
  • TRIK controller
    • About the TRIK controller
      • Screenshot of the TRIK controller screen
    • TRIK controller firmware
      • How to find out the firmware version of the TRIK controller?
    • TRIK controller menu
    • Connecting to the TRIK controller via Wi-Fi
      • Connecting the TRIK controller to a computer and smartphone
      • Connecting the TRIK controller to TRIK Studio
      • Interaction of TRIK controllers
        • An example of solving a problem on the interaction of two robots
    • Connecting to the TRIK controller using UART
    • Launching and uploading programs to the TRIK controller
    • Programming TRIK with the visual programming language
      • TRIK specific blocks
      • Sensory variables for the TRIK controller
    • TRIK controller programming in Python and JavaScript
      • Object «brick»
        • Class «accelerometer»
        • Class «battery»
        • Class «colorSensor»
        • Class «display»
        • Class «encoder»
        • Class «gyroscope»
        • Class «keys»
        • Class «led»
        • Class «lineSensor»
        • Class «motor»
        • Class «objectSensor»
        • Class «sensor»
      • Object «script»
      • Object «mailbox»
      • Object «gamepad»
      • Object «Threading»
      • Function getPhoto
      • Function include
    • TRIK controller web interface
    • Connecting devices to TRIK and working with them
      • Connecting and working with the video module
      • Testing devices connected to the TRIK controller
      • Configuring the operation of a USB camera with a TRIK controller
      • Capturing images with TRIK camera and using them in TRIK Studio
      • Working with battery and charger
  • LEGO EV3 Controller
    • About LEGO EV3
    • Connecting a LEGO EV3 Controller to TRIK Studio
    • LEGO EV3 specific blocks
    • Sensory Variables for the LEGO EV3 Controller
    • Launching and uploading programs to the LEGO EV3
  • LEGO NXT Controller
    • About LEGO NXT
    • LEGO NXT Controller Firmware
    • Connecting a LEGO NXT Controller to TRIK Studio
    • LEGO NXT specific blocks
    • Sensory Variables for the LEGO NXT Controller
    • LEGO NXT C Programming
    • Launching and uploading programs to the LEGO NXT
  • Quadcopter Geoscan Pioneer
    • About quadcopter Geoscan Pioneer
    • Geoscan Pioneer specific blocks
  • TRIK Gamepad
    • About TRIK Gamepad
      • TRIK Gamepad App
      • TRIK Gamepad Utility
    • Robot control from the remote control
  • Feedback
    • Actions in case of TRIK Studio or TRIK controller malfunction
    • Ask a Question
    • trikset.com
Powered by GitBook
On this page
  • Function description
  • Function call
  • Work example
  • Implementing the grayscale function
  • Implementing the image binarization function

Was this helpful?

Export as PDF
  1. TRIK controller
  2. TRIK controller programming in Python and JavaScript

Function getPhoto

PreviousObject «Threading»NextFunction include

Last updated 4 years ago

Was this helpful?

This article is automatically translated from Russian by Google Translator.

Function description

The function returns a one-dimensional array of bytes containing the pixels of an rgb32-formatted image taken from the camera (image size 160x120). This function can be used to solve marker recognition problems.

Function call

var pic = getPhoto();
pic = getPhoto();

Work example

Let's look at an example of converting a frame taken with a camera to grayscale and black-and-white color formats.

Take a picture and display the result with the function.

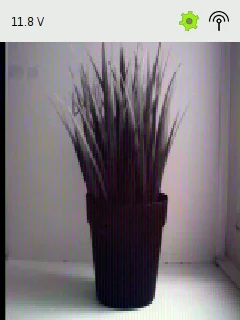
// take a frame in rgb32 format
var pic = getPhoto();
brick.display().show(pic, total_height, total_width, "rgb32");
script.wait(2000);
# take a frame in rgb32 format
pic = getPhoto();
brick.display().show(pic, total_height, total_width, "rgb32");
script.wait(2000);

Rwsult:

Implementing the grayscale function

function grayScale(sPic){
	bufPic = [];
	for(var i = 0; i < total_height; i++)
		for(var j = 0; j < total_width; j++){
			var x = i * total_width + j;
			var p = sPic[x];
			var r = (p & 0xff0000) >> 16;	// take the value of the red component
			var g = (p & 0xff00) >> 8;	// take the value of the green component
			var b = (p & 0xff);		// take the value of the blue component
			p = r * 0.299 + g * 0.587 + b * 0.114; // component Y of YUV
			bufPic[x] = p; 
		}
	return bufPic;
}
def grayScale(sPic):
	bufPic = [];
	for i in range(total_height):
		for j in range(total_width):
			x = i * total_width + j;
			p = sPic[x];
			r = (p & 0xff0000) >> 16;	# take the value of the red component
			g = (p & 0xff00) >> 8; # take the value of the green component
			b = (p & 0xff); # take the value of the blue component
			p = r * 0.299 + g * 0.587 + b * 0.114; # component Y of YUV
			bufPic.append(p); 
	return bufPic;

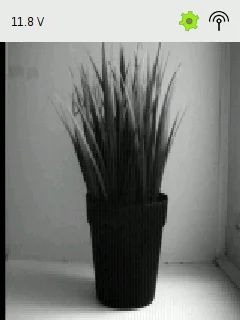
Converts the image to black and white and outputs it to the display:

var pic = grayScale(pic);

brick.display().show(pic, total_height, total_width, "grayscale8");
script.wait(2000);
pic = grayScale(pic);

brick.display().show(pic, total_height, total_width, "grayscale8");
script.wait(2000);

Result:

Implementing the image binarization function

// Binarization - converting the image to black and white
function binarization(treshold, sPic){
	bufPic = []
	for(var i = 0; i < sPic.length; i++){
		bufPic[i] = sPic[i] > treshold ? 255 : 0;
	}
	return bufPic;
}
# Binarization - converting the image to black and white
def binarization(treshold, sPic):
	bufPic = []
	for i in range(len(sPic)):
		bufPic.append(255 if sPic[i] > treshold else 0);
	return bufPic;

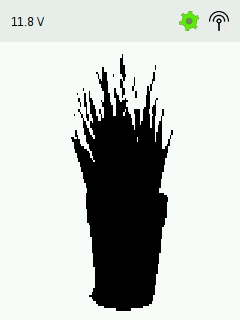
Translates the image to black and white and outputs it to the display:

var pic = binarization(80, pic);
brick.display().show(pic, total_height, total_width, "grayscale8");
script.wait(2000);
pic = binarization(80, pic);
brick.display().show(pic, total_height, total_width, "grayscale8");
script.wait(2000);

Result:

.

An example of a program using the getPhoto function
show